


I am very excited to share about our recent family goal achievement. This is our first time summiting an active Volcano – Mount St. Helens one of the five active volcanoes in state of Washington. We knocked this big item off the bucket list as family hiking adventure and a family goal.
After deciding about this big climb last year, we researched on what to expect, how to get permits, how to train, where to stay night before etc. So, thought to share our experiences with all in case any one is thinking to plan to summit Mount St Helens (as a family with kid/s).


Trail Feature: Forest, Boulder field, Ash field, Crater Rim-Summit.
Trail Head: Climber’s Bivouac Trail Head (Summer route).
Round trip: 10 Miles
Total Elevation: 4500 feet
Highest Point: 8365 feet
Difficulty Level: Difficult and Strenuous
Best Time to go: Late Spring/Early Summer – You get opportunity to glissade down the snow and save some time hiking back to trail head.
Late Summer/Early Fall: if you are looking for snow free hike then but still expect snow/flurries on summit.
How to get Permit
Permit is required to climb beyond 4800 feet and summit Mount St. Helens If you are thinking to climb Mount St Helens between April 1- October 31, you must plan and obtain the permit in advance by paying $22 per person. Summer is the best time to summit the Mount St Helens, due to weather but getting the permit becomes tricky. During other time of year, you can self-register at trail head for free.
The day permit sale gets open online on Mount St Helens Institute site in the morning, with in few hours permits gets sold out. It is like booking a concert ticket. So proper planning is needed. If you are looking to buy permits subscribed to emails that let you know when the permits sale will start in early Spring.

How to train yourself for Mount St. Helens Summit hike
Mount St. Helens climb is not a typical day hike. It is 10 miles round trip with elevation gain of total 4500 feet from which 2500 feet vertical gain is in the boulder fields. The boulder fields are the longest field that we found unending and bit exhaustive. You don’t need to be an expert climber, but it will be more enjoyable experience if you prepare your body for such strenuous hike. This was our first volcano climb so we prepared ourselves by going on hikes
- with similar elevation but shorter miles
- with similar miles.
- hikes that give idea of how boulder fields are.
- Carrying a weighted backpack.
- Cardio and Strength training exercise.
For us, it was a family goal to summit Mount St Helens. So, we had to train my 10-year-old son for this big day climb. And we are glad that whatever hiking/trekking we planned as our training purpose, my son was able to keep up with it. We trained him to carry his own backpack with 2 liters of water bladder, rain jacket, some snacks and hiking poles. Sometimes you need to give children some extra time and there are times when kids perform very well than the adults.

What to Bring apart from Hiking Essentials
Weather on the mountain is not consistent so keep checking the weather forecast for few days and the night before your permit date. Beyond the hiking essentials, there are some important things that you need to bring while summiting Mount St Helens.
Climbing Permit: Don’t forget to carry your Permit with valid identity card. Park Rangers do check your permit on Mount St Helens summit. We were asked to show our permits when we were climbing in the Boulder field where the Rangers just passed by us. Sounds weird. But they were doing their job.
We appreciate their hard work and dedication to keep check on valid permit holders beyond 4800 feet elevation. And this way they make sure that the Mount St Helens summit don’t get flooded with more hikers/climbers other than 100 permit holders as it may not be good for the mountain and environment. Northwest Forest Pass or Inter agency Annual Pass is required to enter this site and park your vehicle at trail head.
Dress in Layers: We started our hike in light Pullovers but by the time we reach summit we were wearing multiple layers with Light weight Down Jackets and gloves. It was very windy and cold at Summit.
Hiking Poles: To help in Ash field and while descending back.
Garden gloves/ Warm gloves: Helps to protect your hands in the boulder field and to keep hands warm.
Micro spikes: Depending on when you do the hike, you may want to carry to micro spikes for snow patches or icy patches.


Climbing Route/ Hiking trail
There are two routes for doing the summit climb of Mount St. Helens.
First route: Climber’s Bivouac trail head also known as Summer route. Climber Bivouac’s trail head gets open in early spring/early summer after snow removal. It gets closed in winter after snow falls starts.
The Second route: Worm Flow route from Marble Mountain Snow park also know as Winter route. Worm Flow route remains open all year for climbing Mount St. Helens with elevation gain of 5700 feet to Summit with 12 miles round trip.

Where to stay night before
Staying near to the Climber Bivouac trail head is important as it is recommended to start the hike early in the morning and this climb takes any time between 8- 14 hours depending on your fitness level.
Climbers Bivouac trail head: We ended up sleeping in our car rolling down the seats, but it is not comfortable and not everyone likes that. The good thing about this trail head is that there are campsites next to it and sites are available on first come first serve basis. There are few toilets but no water and no shower facility.
Lone Fir Resort: If you are looking for comfortable bed with hot shower and other hotels like facilities, then Lone Fir Resort is the best option that is at 30 minutes’ drive from Climbers Bivouac trail head. But this option gets fully booked in advance as it is the only Hotel option preferred by family with children in the Cougar area. We stayed here last time on our visit to Ape Cave National Volcanic Monument in Cougar.
Hiking the trail- Mount St. Helens
After grabbing some periods of sleep in the car, we woke up early in the morning to start our hike. It is recommended to start early as this hike can take longer than anticipated time. First and the important thing, don’t forget to enter your permit and other details in the register journal at trail head. This is very crucial in case if any hiker does not return or goes missing this information helps the park rangers to start search mission.
We started the hike in dark wearing our headlamps after signing in the register. The first 2.1 miles on Ptarmigan trail is an easy hike in a dense wood that gains 1000 feet elevation. On reaching the junction where the Loowit trail intersect with Ptarmigan trail, there is an opportunity to use pit toilet in case some one needs to use it.
Soon we entered the rock scrambling area also known as boulder fields on Monitor Ridge trail where climber’s permit is must. This is not an ordinary boulder field. It gains 2500 vertical feet and the rocks are dusted with ash pumice that can shred the skin in a fall. There is no straight trail or official trail in boulder field, one needs to use all four (2 hands – 2 legs) to do the rock climbing and make your own way. Gloves are good to have in boulder fields as rocks are rough and can hurt your hands while climbing.


As we made our way up the rocks, sky was turning brighter with lovely shades of blue with Sun hiding behind the clouds. We turned around to see the beautiful view of sea of clouds with distant view of Mount Hood and Mount Adam. We stopped to capture few photos of this majestic sight and soon resumed our climb back.
Boulder field is hard to follow, and one can easily get lost in the rocky area. We felt lost many times as were not sure if we were on designated official trail. There are wooden poles/stick with blue diamond marking which serve as trail guide. Every time we felt lost, we looked for the wooden poles. It is like you make your own way in the boulder field by deciding which rock you find sturdy to climb on and move ahead.


The rocky area/boulder field is the tough part of this hike which consumes most of the time and is the place where most of the things go wrong if one gets slipped or fall. So, we took our good time to climb the boulder field. We found Boulder field to be never ending and exhaustive.


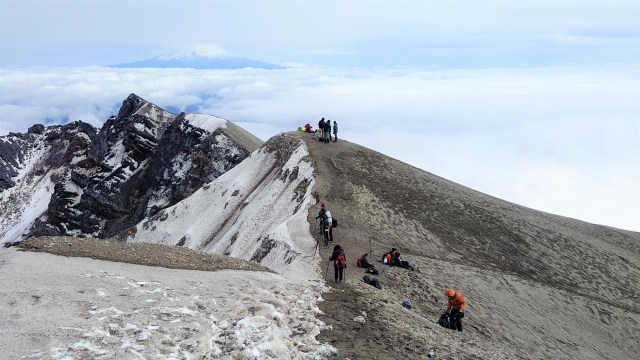
But soon we reached GPS station where boulder field seems to end, and ash field starts. Ash field is last portion of the climb that takes to the summit. But as the name says ash field, it is a field of loose gravel and sand with climbing slope gaining elevation of 1000 feet. Ash field look good in sight but when we started our climb in ash field it became very cold and windy.
Wind gust were pushing us back and making difficult to move ahead. Hiking poles were lot useful to keep the body balance and climb up. Due to strong wind gust, Ash was hitting on our face, going into eyes and mouth. Glad we carried our Sunglasses and bandana to cover our faces. Soon we reached the best part of the hike – the Summit.


It took us around 6 hours to reach the summit. On reaching the summit the view of the crater was enchanting. The mountain rocks surrounding the crater were uniquely colorful. Steam was venting out from the lava dome. It looked like as if we were on Mars. There are ongoing studies and research that says that the center lava dome is growing every year.
We spend 30 minutes on the summit watching the beautiful view of Mount Adams and little glimpse of Mount Rainier floating above the sea of clouds in far vicinity. In spite of strong wind knocking us down the views were worth the struggles. Photographs don’t do the justice to the enchanting magnificent views of the crater and the surrounding mountains.


Extra caution needs to be prevailed while capturing the pictures as the rim is cornice and can easily break collapsing the soil below the feet. We were excited capturing pictures but then within a blink of eye, the clouds covered up the crater view and summit. Fog rolled in blocking the view of crater and light flurries started with temperature dropping below freezing.
We started descending with light flurries turning in to light rainfall. Ash field was tricky on descend but manageable with hiking poles. We were slipping and stopping but soon reached the rock scrambling portion the boulder fields. By the time we reached boulder fields, clouds grew denser reducing the visibility and rain showers started.
We lost the trail many times but thanks to the wooden posts we were able to find them and get back on route making our own way through boulder fields. Scrambling on the rocky portion while descending was bit tough for tender knees.


Soon we made it back to tree line on Ptarmigan trail in the forest. After stopping for a quick break to stretch and relax our shoulders we started back on trail to finish the hike. We were back to our car at trail head in 5 hours with total hike time resulting to 11 hours.
We were glad that we did it in time that we aimed for as a family hike with a 10-year-old kid. And we are proud of our son who did this challenging hike with us with out any complains and carrying his weighted backpack all the way up and all the way down. My son was the only kid on the mountain on the day we summited. We are thankful to all hikers who stopped to appreciate and say kind words to my kid. Those words proved to be energy booster for him.
Mount St. Helens is truly amazing, and the climb is worth the efforts. It challenged us, rewarded us with magnificent views. There are tons of trails, lakes, information centers and lava tubes to explore in Mount St Helens National Volcanic Monument. The famous Ape Caves Lava tubes are third largest in north America. Mount St Helens the active volcano is popular tourist and hiking destination.
Have any questions about summitting Mount St. Helens? Feel free to comment below.
Stay Healthy and Happy…
Pin It for Later…


